Bootable USB is a backup media that allows to recover image-based backups on machines with no operating system. (That technique is called bare-metal recovery.) This article provides instructions on how to create a bootable USB drive with CloudBerry Backup for Windows Server and applies to Windows Server 2008 / 2008 R2, 2012 / 2012 R2, 2016 and 2019.
Table of Contents
Introduction
Bootable USB will contain a cut-down version of Windows with CloudBerry Backup and a number of other tools installed that can be used to boot a machine with no (or corrupted) OS.
Having an image-based backup at hand along with a bootable USB will enable you to quickly restore your Windows Server on any hardware. This prevents you from being caught off guard in an emergency situation.
The procedure for creating a bootable USB is identical for the following versions of Windows Server:
- Windows Server 2008 / Windows Server 2008 r2
- Windows Server 2012 / Windows Server 2012 r2
- Windows Server 2016
- Windows Server 2019
For Windows Server 2003 the procedure is similar, however there are some specifics covered in another article - How to Create a Bootable USB for Windows Server 2003. The main point there is a suggestion to create a recovery disk on a computer that runs Windows 7 or higher as Windows Server 2003 does not contain necessary network components required for recovering system from the cloud.
Before you proceed, ensure that you have an image-based backup in the cloud or local storage. Only use USB drives that have at least 2 GB of storage (8 GB is recommended for Windows Server 2012 and later).
Creating a Bootable USB for Windows Server
Plug your USB drive into the computer where you want to create the bootable USB, launch CloudBerry Backup and follow the steps below.
1 In CloudBerry Backup, click Make Bootable USB button:
 This will launch the Create Recovery Disk dialog window.
2 In the Create Recovery Disk dialog window you can select whether you want to create a bootable USB (that's what we'll do) or whether you want to create a bootable ISO image.

3 You can also use the following additional options in the Create Recovery Disk dialog window:
- Add CloudBerry Remote Assistant to the Recovery Disk
This enables you or someone else who provides administration support to connect to the booted Windows Server.
- Protect Recovery Disk with master password
Specify a master password for extra security to prevent anyone unauthorized from using the USB disk.
- Path to drivers
Specify a folder where additional drivers you’d like to install are located.

Note: Use this option to be able to use this disk for recovery to dissimilar hardware.
4 Once you complete setting up all the options, click Create Disk. The creation of bootable USB usually takes no more than a few minutes, depending on the speed of the USB drive.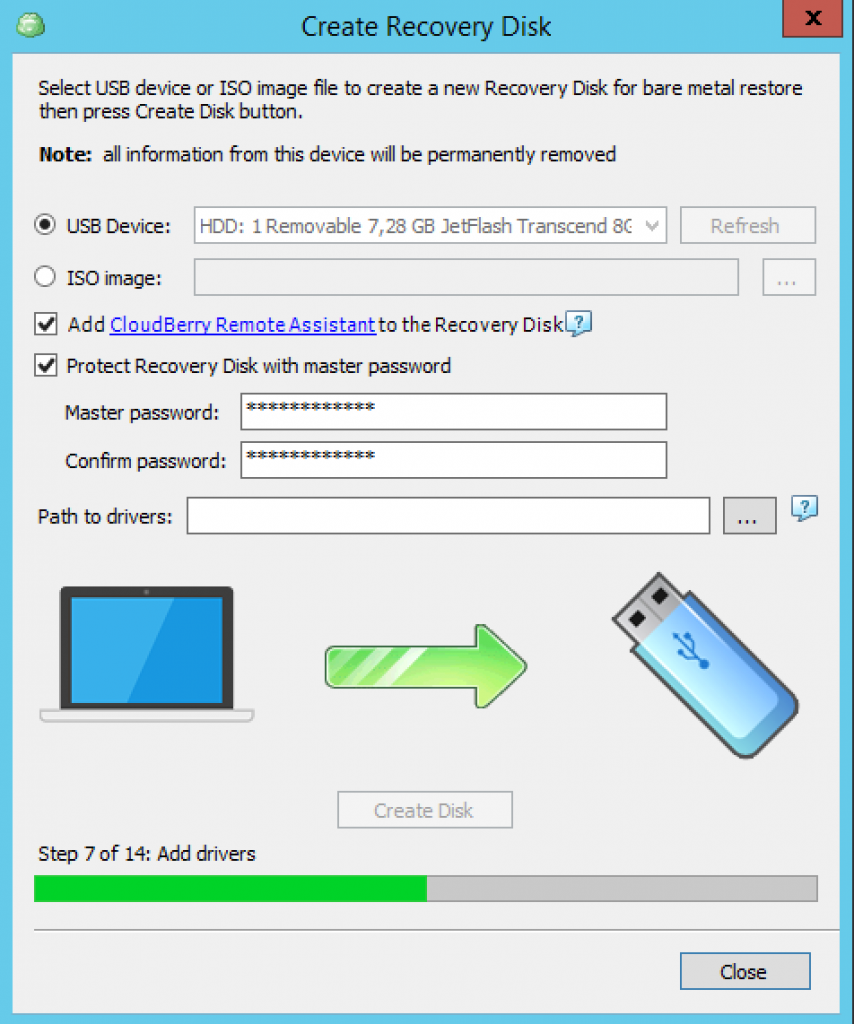
Once the creation is completed, you have a fully-functional bootable USB with an image-based backup which you can use to restore Windows Server.
Restoring Windows Server from a Bootable USB
1Boot up the computer into Boot Manager with the USB stick plugged in. Select the USB Device and press Enter.

2Enter the master password you used when creating the bootable USB and press Enter.

3Click Bare Metal Recovery to launch CloudBerry Backup.

Alternatively, you can launch CloudBerry Remote Assistant by clicking on its icon it the uper right-hand corner (provided that you selected this option when creating the bootable USB). You can use CloudBerry Remote Assistant to give an authorized administrator or support personnel access to your computer.

4 In CloudBerry Backup, launch the Restore Wizard by clicking Restore on the main toolbar or using the Ctrl+R shortcut.

5 In the Restore Wizard, select or add the backup storage that contains the image-based backup. It's essential that the backup prefix of the backup storage matches that of the backup itself.

6 Choose whether you need to run the restore only once (without saving its configuration) or save the restore plan options after completing the wizard.

7 Choose the option Manually:
 It enables you to select which versions of each image to restore:
8 Select Restore as physical disk:

9Select partitions to restore:
10 Select destination for restore:

11 Complete configuring the image restore plan and execute. When the restore process completes, the OS will be fully restored.

12 Once completed, exit CloudBerry Backup and then exit the CloudBerry Boot Menu.

13 You return to the Boot Manager where you need to select your main hard drive which contains the freshly restored OS.

14 Reboot the server and your Windows Server should boot up in the same state from the earlier backup.

Check out our help article for more details on how to use a recovery disk and troubleshooting.
Conclusion
This is how you create a bootable USB drive and perform a recovery of Windows Server 2008 -2019 from the bootable USB. If you have any questions, feel free to let us know in the comments section below.